# Windows Devices - 7 - Windows Tablet Neuinstallation
| Vorarlberger Standardschulinstallation
Verfasser: Lukas Franz, Martin Schnetzer | © 2023 IT-Regionalbetreuer Vorarlberg
6900 Bregenz, Römerstraße 14
Alle Rechte vorbehalten |
## 1 Voraussetzungen
Es werden folgende Komponenten und Programme benötigt.
- - Ein oder mehrere USB-C-Stick(s) (min. 8 GB)
- Windows ISO-File (vobs.at)
- [Rufus](https://rufus.ie/de/) (zur Erstellung des USB-Sticks)
Der VOBS stellt ein Windows Image (11-25H2) zur Verfügung: [WIN11\_25H2\_GERAETINITIATIVE (Surface Go2 und Go4)](https://download.vobs.at/wp-content/uploads/RBDownloads/Software/ServerlessTools/BOOTSTICK_GERAETEINIT_unattend_WIN11x64_25H2_v25.1.iso)
Für Lenovo IdeaPad3 (wegen fehlender WLAN-Treiber notwendig): [WIN11\_25H2\_GERAETINITIATIVE (Lenovo IdeaPad3)](https://download.vobs.at/wp-content/uploads/RBDownloads/Software/ServerlessTools/BOOTSTICK_GERAETEINIT_unattend_WIN11x64_25H2_LenovoIdeaPad3.iso)
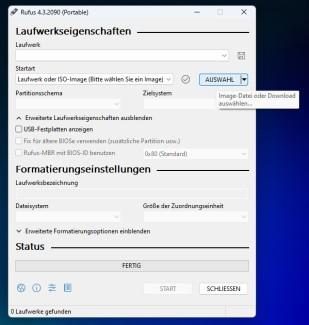
## 2 Bereitstellung des USB-Sticks mit Rufus:
Nach dem Start von Rufus > Image mit AUSWAHL auswählen
[](https://docs.vobs.at/uploads/images/gallery/2025-11/2110dc08-27a5-4c1b-b50b-281b9129fd40.jpg)
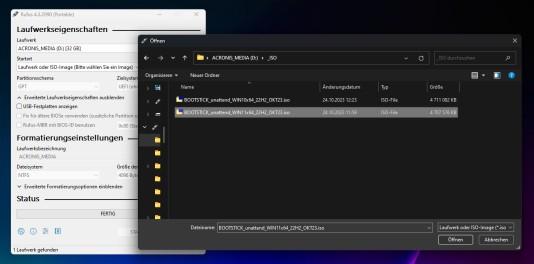
Image auswählen
[](https://docs.vobs.at/uploads/images/gallery/2025-11/325b74f7-728d-43b2-b648-aa2d3397d2a0.jpg)
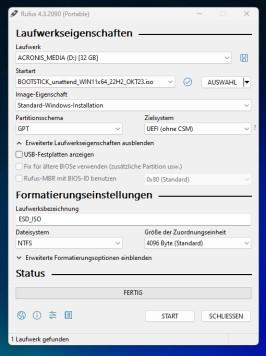
Es sind bereits die Einstellungen GPT und UEFI richtig eingestellt. Umgestellt muss das **Dateisystem** auf **NTFS**. Anschließend auf START klicken und warten
[](https://docs.vobs.at/uploads/images/gallery/2025-11/a59c81f9-3062-4f23-aeb9-10fcfabfa609.jpg)
## 3 Installation des neuen Betriebssystems – Booten vom USB-Stick
Der USB-Stick muss am Gerät angesteckt sein, damit ein Starten (booten) vom Stick möglich ist.
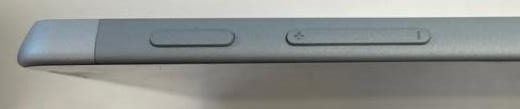
„Lautstärke -“ (1) gedrückt halten und anschließend den Einschaltknopf (2) gedrückt halten, bis das Windows Logo erscheint
Das Surface Gerät startet nun vom Stick und es wird eine frische Installation ausgeführt. Durch eine Neuinstallation werden alle vorher vorinstallierten Programme gelöscht!
Der Rollout kann nun wie gewohnt durchgeführt werden.